Developer Guide
Overview
Mass Linkers is a powerful Desktop application tool that helps Computer Science (CS) students find study support from batchmates.
It provides a centralised platform for CS students to
- save their batchmates’ contact and module details
- search for batchmates with common interests or who are taking similar modules conveniently
It is optimised for use via a Command Line Interface (CLI) while still having the benefits of a Graphical User Interface (GUI).
This Developer Guide provides general information for developers interested in understanding the design implementation of Mass Linkers for further development.
- Overview
- Acknowledgements
- Setting up, getting started
- Design
- Implementation
- Documentation, logging, testing, configuration, dev-ops
- Appendix: Requirements
- Appendix: Future Developments
- Appendix: Instructions for manual testing
Acknowledgements
- This project is based on AddressBook-Level3 by SE-EDU initiative.
- Libraries used: JavaFX, Jackson, JUnit5, PlantUML.
- Font packages used: Ancient Olive Sans Serif Font.
- Logos used: Flaticon.
Setting up, getting started
Refer to the guide Setting up and getting started.
Design
.puml files used to create diagrams in this document can be found in the diagrams folder. Refer to the PlantUML Tutorial at se-edu/guides to learn how to create and edit diagrams.
Architecture
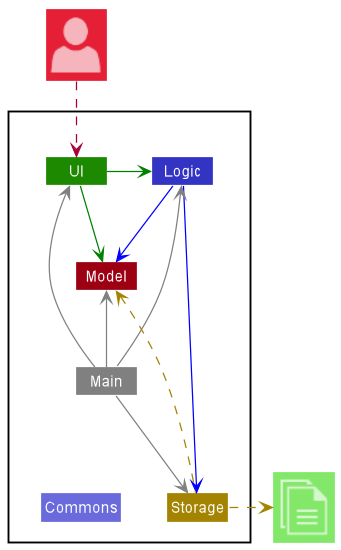
The Architecture Diagram given above explains the high-level design of the App.
Given below is a quick overview of the main components and how they interact with each other.
Main components of the architecture
Main has two classes called Main and MainApp. It is responsible for,
- At app launch: Initialises the components in the correct sequence and connects them up with each other.
- At shutdown: Shuts down the components and invokes cleanup methods where necessary.
Commons represents a collection of classes used by multiple other components.
The rest of the App consists of four components.
-
UI: The UI of the App. -
Logic: The command executor. -
Model: Holds the data of the App in memory. -
Storage: Reads data from and writes data to the hard disk.
How the architecture components interact with each other
The Sequence Diagram below shows how the components interact with each other for the scenario where the user issues the command delete 1.
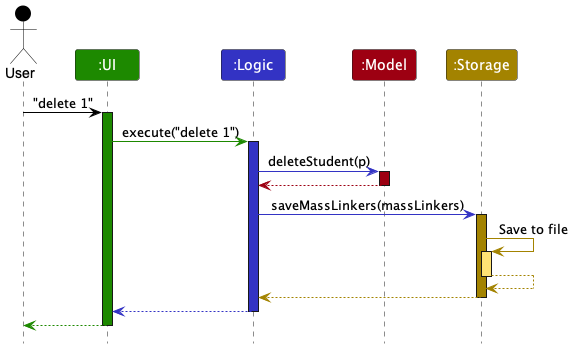
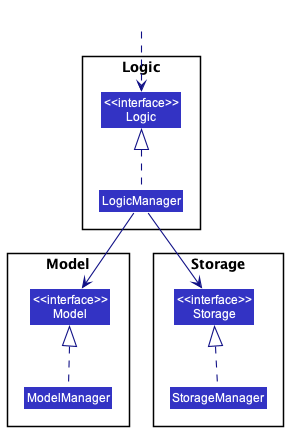
Each of the four main components (also shown in the diagram above),
- defines its API in an
interfacewith the same name as the Component. - implements its functionality using a concrete
{Component Name}Managerclass (which follows the corresponding APIinterfacementioned in the previous point).
For example, the Logic component defines its API in the Logic.java interface and implements its functionality using the LogicManager.java class, which follows the Logic interface. Other components interact with a given component through its interface rather than the concrete class (reason: to prevent outside component’s being coupled to the implementation of a component), as illustrated in the (partial) class diagram below.
The sections below give more details about each component.
UI component
The API of this component is specified in Ui.java.
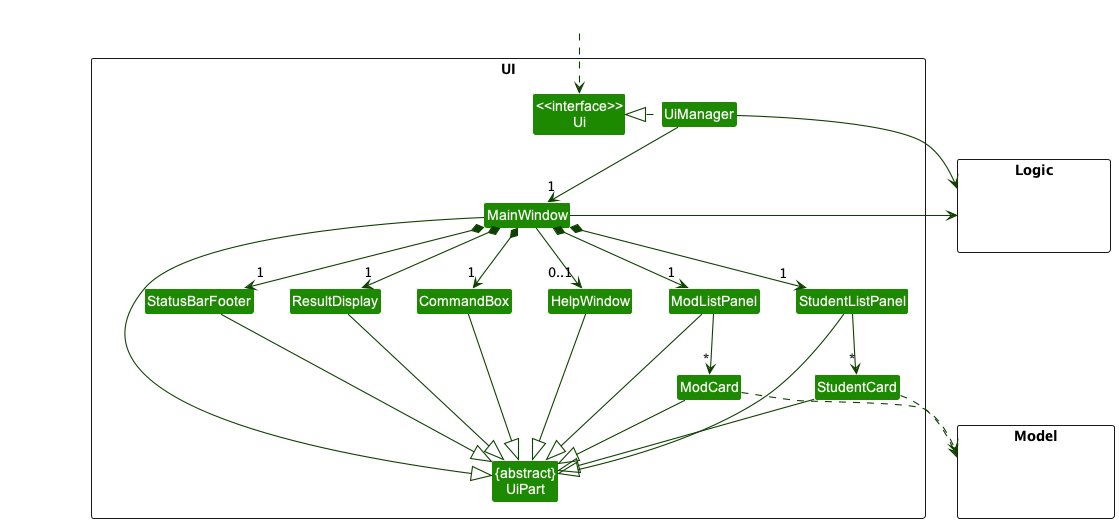
The UI consists of a MainWindow that is made up of parts e.g.CommandBox, ResultDisplay, StudentListPanel, ModListPanel, StatusBarFooter etc. All these, including the MainWindow, inherit from the abstract UiPart class, which captures the commonalities between classes representing parts of the visible GUI.
The UI component uses the JavaFx UI framework. The layout of these UI parts is defined in matching .fxml files in the src/main/resources/view folder. For example, the layout of the MainWindow is specified in MainWindow.fxml.
The UI component,
- executes user commands using the
Logiccomponent. - listens for changes to
Modeldata so that the UI can be updated with the modified data. - keeps a reference to the
Logiccomponent, because theUIrelies on theLogicto execute commands. - depends on some classes in the
Modelcomponent, as it displaysStudentobject residing in theModel.
Logic component
API : Logic.java
Here’s a (partial) class diagram of the Logic component:
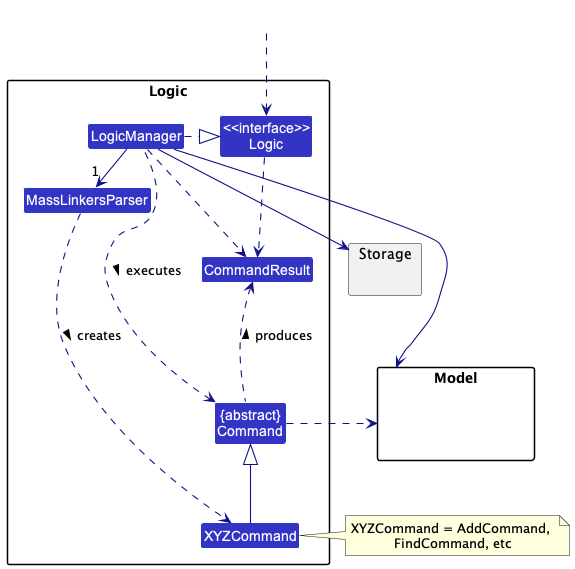
How the Logic component works:
- When
Logicis called upon to execute a command, it uses theMassLinkersParserclass to parse the user command. - This results in a
Commandobject (more precisely, an object of one of its subclasses e.g.,AddCommand), which is executed by theLogicManager. - The command can communicate with the
Modelwhen it is executed (e.g. to add a student). - The result of the command execution is encapsulated as a
CommandResultobject which is returned back fromLogic.
The Sequence Diagram below illustrates the interactions within the Logic component for the execute("delete 1") API call.
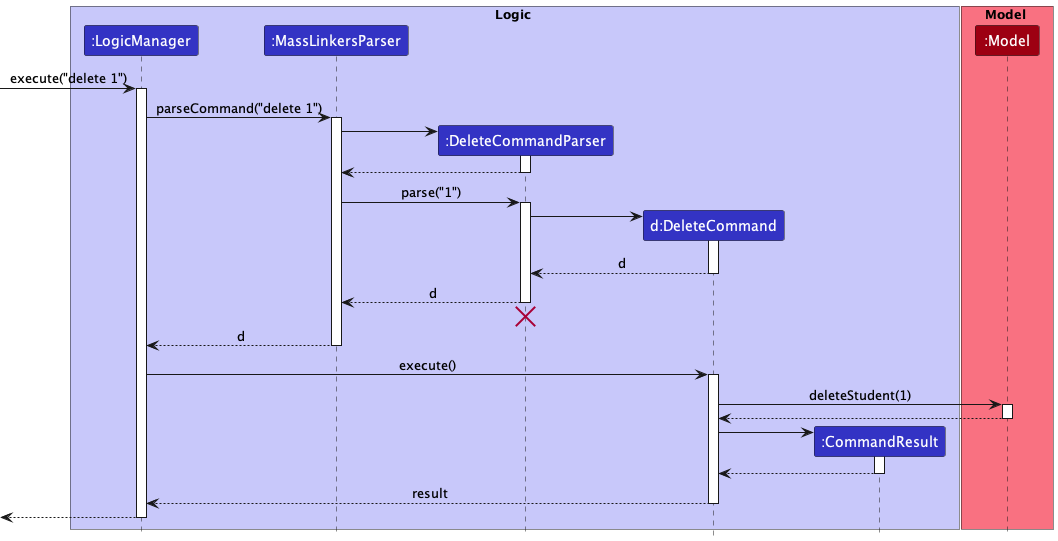
DeleteCommandParser should end at the destroy marker (X), but due to a limitation of PlantUML, the lifeline reaches the end of the diagram.
Here are the other classes in Logic (omitted from the class diagram above) that are used for parsing a user command:
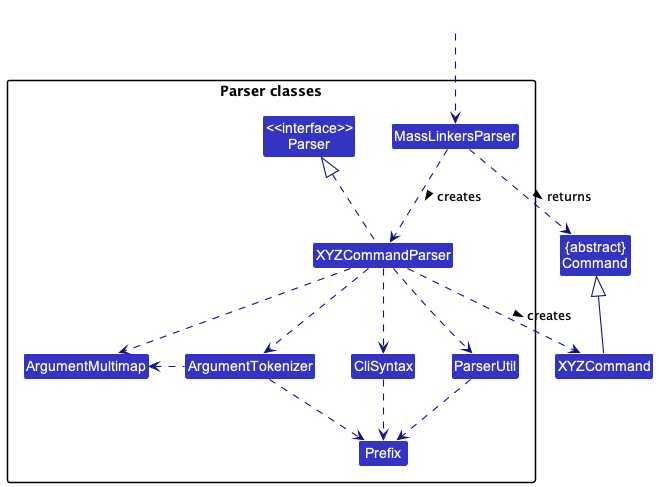
How the parsing works:
- When called upon to parse a user command, the
MassLinkersParserclass creates anXYZCommandParser(XYZis a placeholder for the specific command name, e.g.,AddCommandParser), which uses the other classes shown above to parse the user command and create anXYZCommandobject (e.g.,AddCommand) which theMassLinkersParserreturns as aCommandobject. - All
XYZCommandParserclasses (e.g.,AddCommandParser,DeleteCommandParser, …) inherit from theParserinterface so that they can be treated similarly where possible e.g., during testing.
Model component
API : Model.java
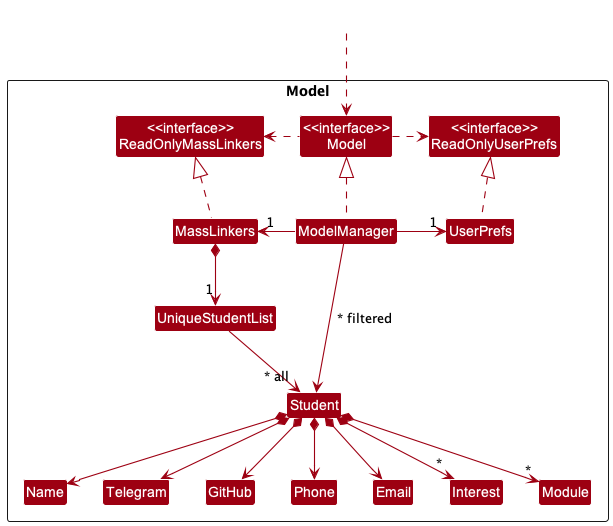
The Model component,
- stores the mass linkers data, i.e., all
Studentobjects (contained in aUniqueStudentListobject). - stores the currently ‘selected’
Studentobjects (e.g., results of a search query) as a separate filtered list which is exposed to outsiders as an unmodifiableObservableList<Student>that can be ‘observed’ e.g. the UI can be bound to this list so that the UI automatically updates when the data in the list change. - stores a
UserPrefobject that represents the user’s preferences. This is exposed to the outside as aReadOnlyUserPrefobject. - does not depend on any of the other three components (as the
Modelrepresents data entities of the domain, they should make sense on their own without depending on other components).
Interest list in the MassLinkers, which Student references. This allows MassLinkers to only require one Interest object per unique tag, instead of each Student needing their own Interest objects.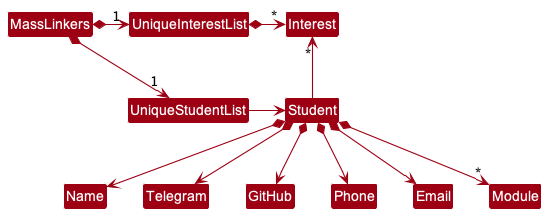
Storage component
API : Storage.java
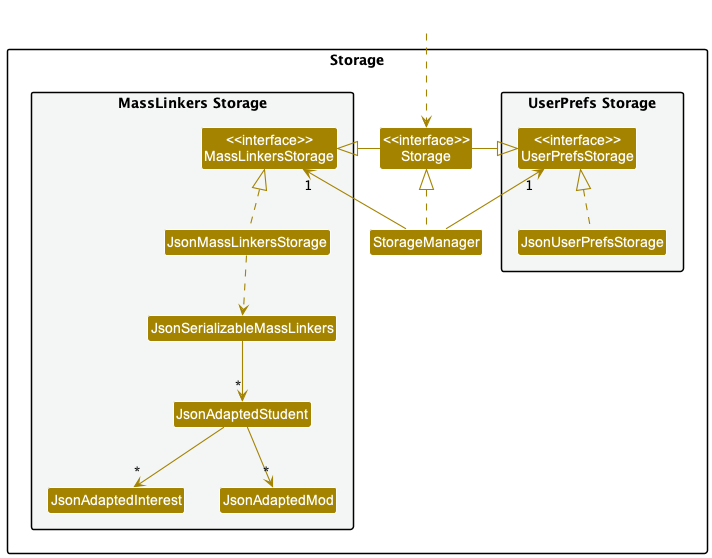
The Storage component,
- can save both Mass Linker’s data and user preference data in JSON format and read them back into corresponding objects.
- inherits from both
MassLinkersStorageandUserPrefStorage, which means it can be treated as either one (if only the functionality of only one is needed). - depends on some classes in the
Modelcomponent (because theStoragecomponent’s job is to save/retrieve objects that belong to theModel).
Common classes
Classes used by multiple components are in the seedu.masslinkers.commons package.
Implementation
This section describes some noteworthy details on how certain features are implemented.
1. Find Interest Feature
Implementation
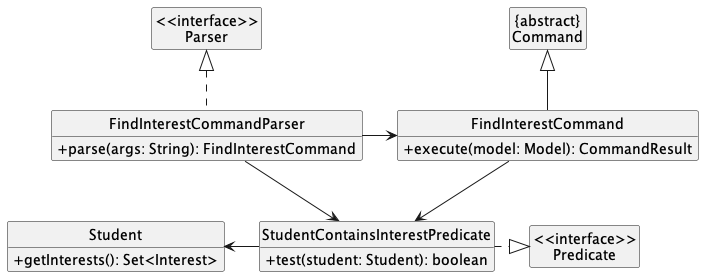
The FindInterestCommandParser reads the specified interests entered by the student in FindInterestCommandParser#parse.
The specified interests are then passed as a StudentContainsInterestPredicate predicate for execution in FindInterestCommand#execute.
During execution, the interests of every batchmate will be tested against the aforementioned predicate. If all interests specified are found in a batchmate’s interests, that batchmate will be filtered out and displayed. The result would be a list of all batchmates that are filtered out.
The following (partial) class diagram shows how the different classes involved in the find interest operation interact with one another:
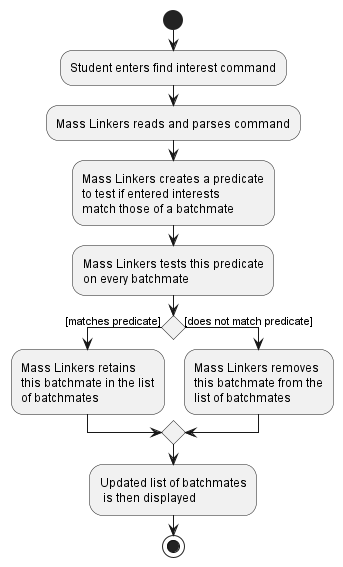
The following activity diagram summarises what happens when a student enters a findInt command, assuming the command is valid, and no error occurs:
Design considerations
Aspect: How findInt executes:
-
Alternative 1 (current choice): Finds all batchmates whose interests match all interests specified (i.e. a superset of those specified).
- Pros: A specific search to find batchmates who have the same interests as the student. (Specifying
aiandswewill result in a batchmate whose interests areai,sweandalgoto be displayed). - Cons: Search might be too narrow since it excludes batchmates that have some but not all the interests specified. (Specifying
aiandswewill not result in a batchmate whose only interest isaito be displayed).
- Pros: A specific search to find batchmates who have the same interests as the student. (Specifying
-
Alternative 2: Finds all batchmates whose interests match at least one specified interest.
- Pros: A more general search might be useful for finding a greater number of batchmates who share some of the interests of the student.
- Cons: It diminishes the usefulness of searching for multiple interests at once if a general search is implemented. The purpose of specifying multiple interests is so that the search results would be specific.
2. Mod Mark Feature
Implementation
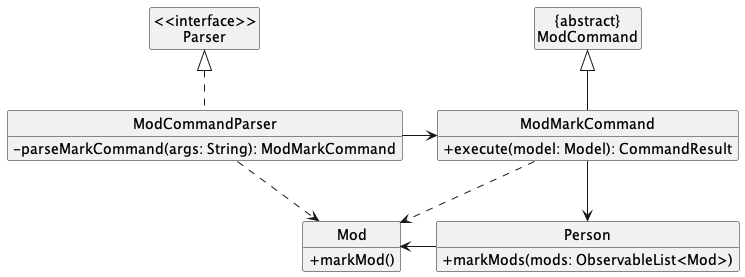
The ModCommandParser implements the operation ModCommandParser#parseMarkCommand(String args) to read inputs entered by the student for execution in ModMarkCommand. ModMarkCommand extends ModCommand to execute the mod mark command.
During execution, all modules specified by the student are marked in the Student class with the operation Student#markMods(ObservableList<Mod> mods). This is because the list of modules is stored and associated with a Student. Hence any updates on the module status in the current list of modules will be handled in Student. Each individual module is then marked in the Mod class with the operation Mod#markMod().
The following (partial) class diagram shows how the different classes involved in the mod mark operation interact with one another:
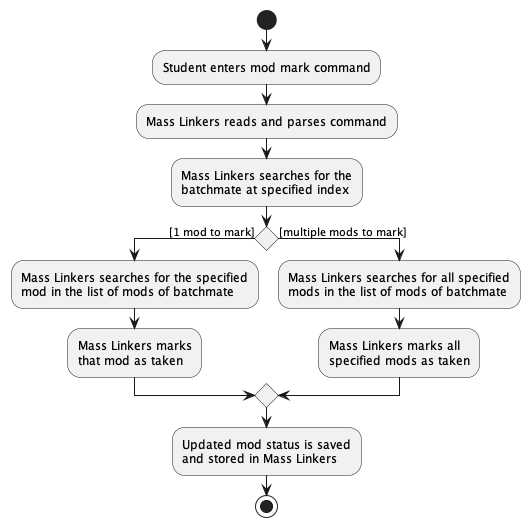
The following activity diagram summarises what happens when a student enters a mod mark command, assuming the command is valid, and no error occurs:
Design considerations
Aspect: How mod mark executes:
-
Alternative 1 (current choice): Marks mods of a batchmate whose index is specified.
- Pros: Easier to implement. Shorter command to enter.
- Cons: May be hard to find and locate the index of the batchmate, especially when the list of batchmates is long.
-
Alternative 2: Marks mods of a batchmate whose name is specified.
- Pros: Easier to find the batchmate by directly entering the name.
- Cons: Full name of the batchmate has to be specified. It may take more time to enter the name, especially for long and complicated names.
3. Mod Find Feature
Implementation
The ModCommandParser implements the operation ModCommandParser#parseFindCommand(String args) to read inputs entered by the student for execution in ModFindCommand. ModFindCommand extends ModCommand to execute the mod find command.
During execution, the user inputs of module codes are passed into a List to ModContainsKeywordsPredicate.
For simplicity, we will call this List of module codes keywords. ModContainsKeywordsPredicate#test(Student student) returns true for a particular Student only if every element in keywords is in Mod of this Student (stored as ObservableList<Mod>).
Checking whether the elements in the keywords and Mod match each other is done by the StringUtil#containsWordIgnoreCase(String sentence, String word).
The result of ModContainsKeywordsPredicate#test(Student student) is then used by Model#updateFilteredStudentList to filter those Student with the specified module(s) when ModFindCommand#execute(Model model) is called.
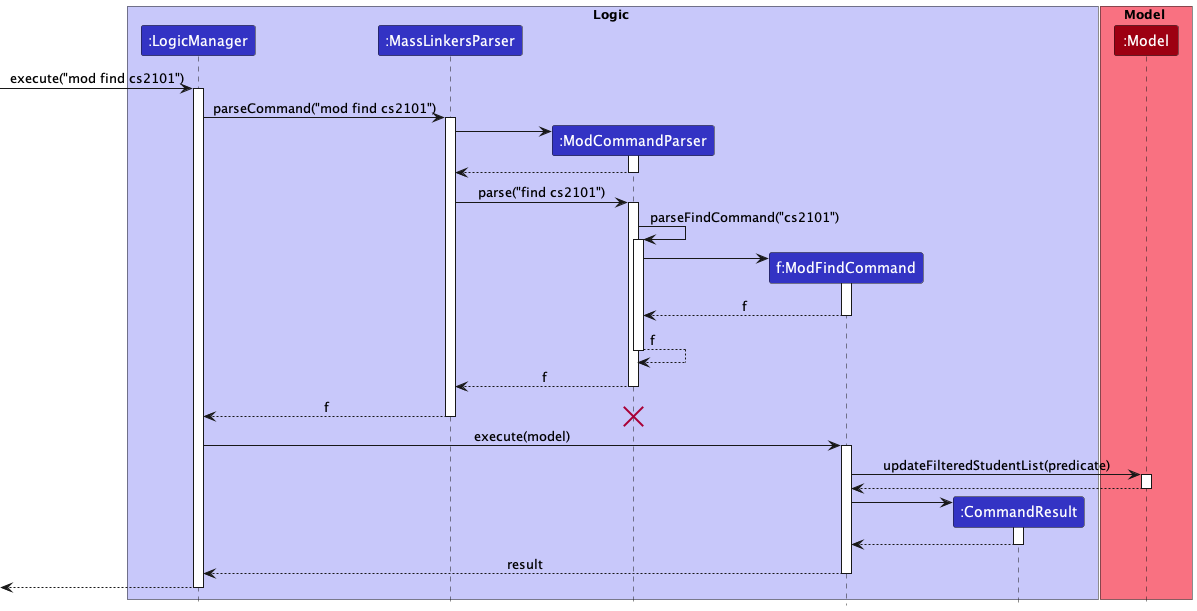
The following sequence diagram shows how the different classes involved in the mod find operation interact with one another:
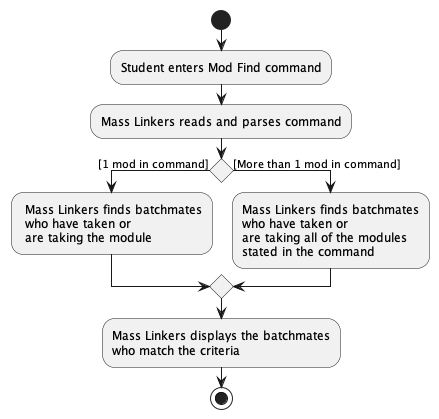
The following activity diagram summarises what happens when a student enters a mod find command, assuming the command is valid, and no error occurs:
Design considerations
Aspect: How mod find executes:
-
Alternative 1 (current choice): Modules will be identified only if user inputs fully match the module code. For instance,
mod find cs1231does not return batchmates with the moduleCS1231S(lacking an “S”).- Pros: Reduces confusion. Requiring exact module code will display batchmates that are tailored to the specifications, reducing the need to manually filter through the list of
Student. Imagine that if the system allows partial matching of module codes, typingmod find csyields all Computer Science batchmates with modules having the code “CS” to be displayed. - Cons: If the desired module code is so unique that partial matching can suffice to pinpoint the module, requiring a fully matching input would cause some inconvenience to the user.
- Pros: Reduces confusion. Requiring exact module code will display batchmates that are tailored to the specifications, reducing the need to manually filter through the list of
-
Alternative 2: Modules can be identified by partially matching inputs of module codes. For instance,
mod find 123will returnStudentwith the moduleCS1231S.- Pros: Shorter commands to enter and grants greater convenience to users.
- Cons: If many module codes share the same partial module code that the user inputs, many batchmates will be returned, rendering the
mod findfunction ineffective as users still need to manually search for batchmates with the desired module.
4. Module Categorisation
Implementation
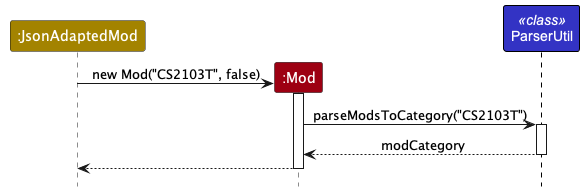
Module categorisation is handled by ParserUtil#parseModsToCategory(String modName).
A category is assigned to every mod upon creating it through its constructor.
This categorisation is not saved in Storage.
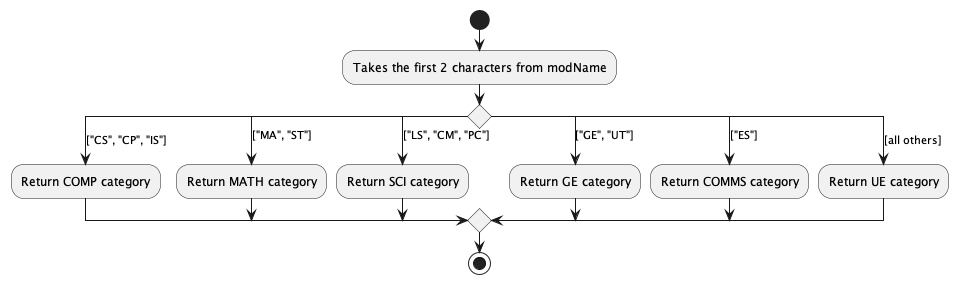
The module categories can be viewed here.
Upon calling the constructor of Mod to create a new instance, the constructor
will then call ParserUtil#parseModsToCategory(String modName) which returns a ModCategory
corresponding to the modName.
A new Mod instance with its modName and modCategory is created.
This modCategory will later be used to colour code mods in the UI.
The (partial) sequence diagram below shows the categorisation of a new mod when
its constructor is called in JsonAdaptedMod.
The (partial) activity diagram below summarises what happens when a new mod is created in JsonAdaptedMod
assuming no errors occur.
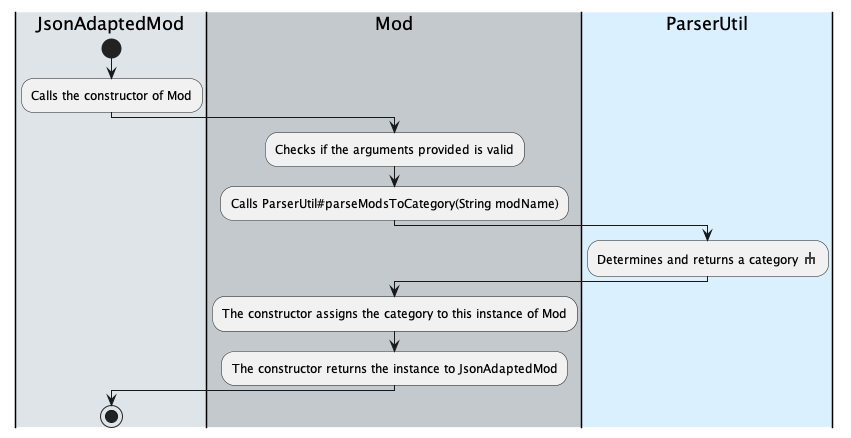
Activity: Determines and returns a category.
Design considerations
Aspect: How categorisation is handled:
-
Alternative 1 (current choice): All categorisation is handled upon creation of a
Modinstance.- Pros: Easier to implement. Less bug-prone. No need to save mod categorisation.
- Cons: User is unable to edit the mod categories. Lowers performance.
-
Alternative 2: Categories of mods are saved into Storage.
- Pros: Users can edit mod categories with fewer changes to the code base. Increased performance.
- Cons: Increased complexity.
5. Add Interest Feature
Implementation
The addInt command allows students to add one or more interests to a batchmate by indicating the index held by the batchmate and the list of interests to be added.
The command takes in two arguments:
-
IndextargetIndex -
Set<Interest>interests
Each Student has a Set of Interest. Adding an Interest to a batchmate would add to the set of Interest of the Student with the targetIndex. The Add Interest mechanism is facilitated by AddInterestCommand, which extends from Command and AddInterestCommandParser, which extends from
Parser. AddInterestCommandParser serves to parse the command arguments and create a new AddInterestCommand object. AddInterestCommandhandles adding the Interest to the set of Interest of the Student.
Below are the steps:
- When the student enters the
addIntcommand, theLogicManageris executed and it calls theMassLinkersParserto parse the command. - A new
AddInterestCommandParserobject is constructed. -
AddInterestCommandParser#parseparses the command arguments and returns a set of Interests. A newAddInterestCommandis constructed. -
AddInterestCommandis returned to theLogicManager, which invokesAddInterestCommand#execute. - The
Indexis verified to be valid and if so, the list of interests is added to theStudentmarked byIndex. -
Studentis updated with the added interests.ModelManagerwill also be updated with the changes.
The sequence diagram for the command addInt 1 algo is as follows.
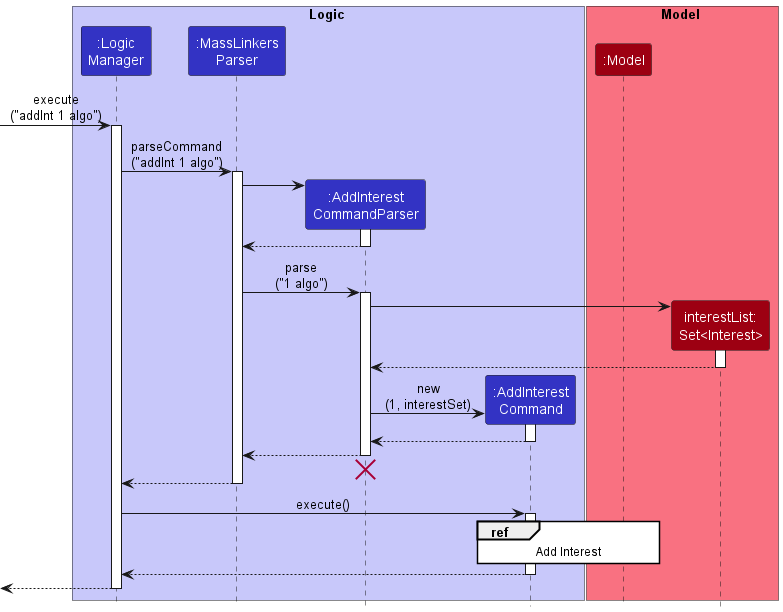
AddInterestCommandParser should end at the destroy marker (X), but due to a limitation of PlantUML, the lifeline reaches the end of the diagram.
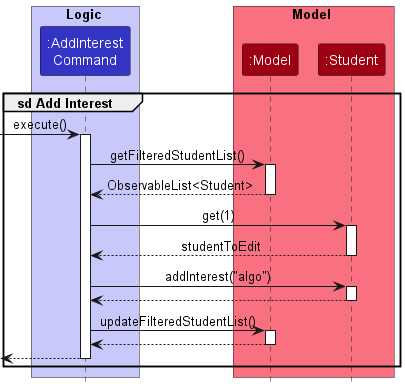
In addition, the sequence diagram below illustrates how the AddInterestCommand interacts with Model to update the added interests in Mass Linkers.
Design considerations
Aspect: Usefulness of AddInterestCommand:
- The current
EditCommandallows users to update interests. However, this involves overwriting all the current interests. Hence,addIntis useful to provide a quick way to add new interests to aStudent.
Aspect: Managing the List of Interests:
-
Alternative 1 (current choice): Store the set of
Interestas a field in theStudentclass.- Pros: Easier to implement. The use of a
HashSetcan handle duplicates. - Cons: There is less abstraction as the logic of getting the list and adding to the list is handled by
Student.
- Pros: Easier to implement. The use of a
-
Alternative 2: Have a
UniqueInterestListto handle the list of Interests (similar to that ofUniqueStudentList).- Pros: The low-level details of adding, removing and checking the interests are abstracted. There is greater adherence to the Single Responsibility Principle as the list of interests is handled by the
UniqueInterestListclass. - Cons: The number of
Interestis usually not that large, so Alternative 2 could result in unnecessary implementation overhead.
- Pros: The low-level details of adding, removing and checking the interests are abstracted. There is greater adherence to the Single Responsibility Principle as the list of interests is handled by the
Documentation, logging, testing, configuration, dev-ops
Appendix: Requirements
Product scope
Target user profile:
- Computer Science students at NUS
- Provides a centralised platform for Computer Science (CS) students to find study support from batchmates with common modules. It allows students to save their CS batchmates’ contact details in one place, find common modules and form study groups.
Value proposition: Easily find batchmates to form study groups or ask for module-related advice.
- Provides a centralised platform for students to share their contact info for easier communication.
- Provides convenience for students to find batchmates who are taking the same modules or have the same interests.
- Provides convenience for students to find batchmates who have taken their mods before to ask them for module-related advice.
User stories
Priorities: High (must have) - * * *, Medium (nice to have) - * *, Low (unlikely to have) - *
| Priority | As a … | I want to … | So that I can… |
|---|---|---|---|
* * * |
student | add my batchmates to Mass Linkers | keep track of information about the people I have met |
* * * |
student | add my batchmate’s name | identify their details |
* * * |
student | add my batchmate’s phone number | message or call them, especially in urgent situations. |
* * * |
student | add my batchmate’s telegram handle | contact and chat with them conveniently |
* * * |
student | add my batchmate’s email address | share documents and files with them |
* * * |
student | add my batchmate’s GitHub usernames | find their profiles |
* * * |
student | edit the list of batchmates in Mass Linkers | keep them up to date |
* * * |
student | choose the batchmate I want to edit | write to the correct person |
* * * |
student | edit my batchmate’s name | change the alias or amend if I keyed in wrongly |
* * * |
student | edit my batchmate’s phone number | change it accordingly when they change |
* * * |
student | edit my batchmate’s telegram handle | change it accordingly when they change |
* * * |
student | edit my batchmate’s GitHub usernames | change it accordingly when they change |
* * * |
student | search and access the list of batchmates I have in Mass Linkers | |
* * * |
student | easily search for a specific person by their name / GitHub username / Telegram handle | quickly get their details |
* * * |
student | find a list of batchmates that share the same interests as me | find batchmates to whom I can better relate to |
* * * |
student | search the list of batchmates by the mods they have or are taking | ask them about the mod when I have a module-specific doubt |
* * * |
student | add, edit and see what mods my batchmates have taken or are taking | ask them module-related questions when I have any doubts |
* * * |
student | add a mod to the list of mods for the selected batchmate | |
* * * |
student | delete a mod from the list of mods for the selected batchmate | |
* * * |
student | easily see the mods a selected batchmate is currently taking or has taken | |
* * * |
student | mark a mod as completed or is currently taking for a particular person | know whether he or she is taking the module or has taken the module |
* * |
student | view mods colour-coded by their mod type | easily identify the mods |
* * |
user | fully utilise Mass Linkers with an easy-to-use interface | |
* * |
user | view all the available commands | know what to type for the various functions |
* * |
user | have a clean and polished interface that is aesthetically pleasing | |
* * |
busy user | have an interface that is self-explanatory | reduce time spent on learning how to use the program |
* * |
user | close the application with a command instead of using the mouse to close the window | |
* * |
student | save and export the data | the address book has greater scalability and can be shared with others |
* * |
student | save my data to a file and use it on another computer | access the data on different devices |
* * |
student | export the data | share it with my friends |
* * |
user | have a comprehensive and comprehensible documentation | easily access all the information about Mass Linkers |
* * |
user | have a help page with Frequently Asked Questions (FAQ) | self-diagnose any issues I may encounter |
* * |
technical user | have a short installation guide with concrete steps on how to run the program | set it up on my own with some technical knowledge |
* * |
advanced user | have a short guide to all the commands/functions I can do in the application | save time |
* |
non-technical user | have an installation video guide | follow and run the program without much technical knowledge |
Use cases
(For all use cases below, the System is Mass Linkers and the Actor is the student, unless specified otherwise)
Use case 1: Add a batchmate’s information
MSS
- Student chooses to add a batchmate’s contact.
- Student enters batchmate’s particulars.
- Mass Linkers adds batchmate to current list of batchmates.
Use case ends.
Extensions
- *a. At any time, Student chooses to close Mass Linkers.
- a1. Mass Linkers updates the storage file.
Use case ends.
- a1. Mass Linkers updates the storage file.
Use case 2: Remove a batchmate
MSS
- Student requests for the list of batchmates.
- Mass Linkers shows the current list of batchmates.
- Student requests to delete a specific batchmate in the list.
- Mass Linkers deletes the specified batchmate.
Use case ends.
Extensions
- 2a. The list is empty.
Use case ends. - 3a. Mass Linkers detects an incorrect phone number in the entered command.
- 3a1. Mass Linkers warns the user that the phone number is incorrect.
Use case resumes from step 4.
- 3a1. Mass Linkers warns the user that the phone number is incorrect.
- 3b. The specified batchmate is not found.
- 3b1. Mass Linkers detects an error in specified batchmate (invalid index).
- 3b2. Mass Linkers requests for a valid batchmate.
- Steps 3b1-3b2 are repeated until a valid index is given.
Use case resumes from step 4.
- *a. At any time, Student chooses to close Mass Linkers.
- a1. Mass Linkers updates the storage file.
Use case ends.
- a1. Mass Linkers updates the storage file.
Use case 3: Add an interest to a batchmate
MSS
- Student chooses to add an interest to a batchmate.
- Mass Linkers searches through the list of batchmates for the selected batchmate.
- Mass Linkers adds the interests to the batchmate.
Use case ends.
Extensions
- 2a. The list of batchmates is empty.
- 2a1. Mass Linkers warns adding an interest is invalid.
Use case ends.
- 2a1. Mass Linkers warns adding an interest is invalid.
- 2b. Mass Linkers detects an error in specified batchmate (non valid index).
- 2b1. Mass Linkers requests for new batchmate details.
- Step 2b1 is repeated until a batchmate is found.
Use case resumes from step 3.
- *a. At any time, Student chooses to close Mass Linkers.
- a1. Mass Linkers updates the storage file.
Use case ends.
- a1. Mass Linkers updates the storage file.
Use case 4: Search batchmates via interests
MSS
- Student requests the list of batchmates with the specified interests.
- Mass Linkers return the list of batchmates associated with the particular interests.
Use case ends.
Extensions
- 1a. Mass Linkers detect an invalid input. (No interests specified by the student).
- 1a1. Mass Linkers requests for at least one interest to be specified.
- 1a2. Student inputs new interests.
- Steps 1a1-1a2 are repeated until input is valid.
Use case resumes from step 2.
- *a. At any time, Student chooses to close Mass Linkers.
Use case ends.
Use case 5: Mark a module completed
MSS
- Student requests the list of modules for a batchmate.
- Student requests to mark a module complete.
- Mass Linkers marks the module completed.
Use case ends.
Extensions
- 2a. The list of modules is empty.
- 2a1. Mass Linkers warns marking a module is invalid.
Use case ends.
- 2a1. Mass Linkers warns marking a module is invalid.
- 2b. Mass Linkers detect the specified module is invalid (out of range).
- 2b1. Mass Linkers requests for new module.
- Step 2b1 is repeated until a module is found.
Use case resumes from step 3.
- *a. At any time, Student chooses to close Mass Linkers.
- a1. Mass Linkers updates the storage file.
Use case ends.
- a1. Mass Linkers updates the storage file.
Use case 6: Edit Batchmate
MSS
- Student requests the list of batchmates.
- Mass Linkers display a list of batchmates.
- Student requests to edit a specific batchmate in the list with the new details.
- Mass Linkers updates the details of said batchmate.
Use case ends.
Extensions
- 2a. The list of batchmates is empty.
Use case ends. - 3a. Mass Linkers detects an error in the entered command.
- 3a1. Mass Linkers requests for the correct command.
- 3a2. Student enters a new command.
Steps 3a1-3a2 are repeated until the command entered is correct.
Use case resumes from step 4.
- 3b. Mass Linkers detects an incorrect phone number in the edited batchmate.
- 3b1. Mass Linkers warns the user that the phone number is incorrect.
Use case resumes from step 4.
- 3b1. Mass Linkers warns the user that the phone number is incorrect.
- 3c. Mass Linkers could not find the batchmate specified.
- 3c1. Mass Linkers requests the user to input a valid batchmate.
- 3c2. Student enters a new command.
Steps 3c1-3c2 are repeated until the command entered is correct.
Use case resumes from step 4.
- *a. At any time, Student chooses to close Mass Linkers.
- a1. Mass Linkers updates the storage file.
Use case ends.
- a1. Mass Linkers updates the storage file.
Use case 7: Add module
MSS
- Student requests to add modules to a specific batchmate.
- Mass Linkers add modules to said batchmate.
Use case ends.
Extensions
- 1a. The list of batchmates is empty.
Use case ends. - 2a. Mass Linkers detects an error in the entered command.
- 2a1. Mass Linkers requests for the correct command.
- 2a2. Student enters a new command.
Steps 2a1-2a2 are repeated until the command entered are correct.
Use case ends.
- 2b. Mass Linkers could not find the batchmate specified.
- 2b1. Mass Linkers requests the user to input a valid batchmate.
- 2b2. Student enters a new command.
Steps 2b1-2b2 are repeated until the command entered are correct.
Use case ends.
- *a. At any time, Student chooses to close Mass Linkers.
- a1. Mass Linkers updates the storage file.
Use case ends.
- a1. Mass Linkers updates the storage file.
Non-Functional Requirements
- Should work on any mainstream OS as long as it has Java
11or above installed. - Should be able to hold up to 1000 batchmates without a noticeable sluggish performance for typical usage.
- A user with above-average typing speed for regular English text (i.e. not code, not system admin commands) should be able to accomplish most of the tasks faster using commands than the mouse.
- The GUI should work well with standard screen resolutions 1920x1080 and higher. i.e. GUI does not appear to be cut or distorted.
- For every action by the user, the result should be visible within 5 seconds.
- The project should not depend on any remote servers.
- The software and documentation should be accessible to users with a basic command of English.
- The packaged JAR file should not exceed 100MB.
- The software should work without the need for an installer.
- The product should not be able to verify the legitimacy of the information provided by the student.
Glossary
- Batchmate: The people whom the users need to link to and interact with.
- Command Line Interface (CLI): A text of lines input by the users to send instructions to the system.
- Graphical User Interface (GUI): A means, supported by visuals, for the users to send instructions to the system.
- Mainstream OS: Windows, Linux, Unix, OS-X.
- Private contact detail: A contact detail that is not meant to be shared with others.
- Student: The main user.
Appendix: Future Developments
Due to time and manpower constraints, several good-to-have features were considered for future developments.
1. Undo Command
Several of the commands can create drastic changes to the data in Mass Linkers, such as mod mark all, which would mark every module for all students as taken and clear, which would delete all the data existing in Mass Linkers.
Having an undo feature would be valuable to help users overcome the problem of executing these commands unintentionally and needing to revert the changes made.
2. Selecting a batchmate using CLI
Mass Linkers is targeted at users who can type fast and prefer typing as the primary form of input.
Currently, the selection of a batchmate in the Students panel to view their modules can only be done via the GUI interface by clicking on the particular batchmate.
Having a mod view INDEX command would give users an option to select a batchmate with index INDEX using the CLI, helping Mass Linkers align more to its typing-preferred characteristic.
3. Auto-scroll when a batchmate is added
Currently, the Students panel does not scroll to the bottom when a batchmate is added, and the row exceeds the currently displayed list of batchmates in the Students panel.
Implementing the Students panel to display the most-recently added batchmate would help in enhancing the user experience, and users do not need to manually scroll to the bottom each time.
4. Display students in alphabetical order
Currently, students are displayed in the Students panel based on chronological order; the most recently added student would be the last.
Looking ahead, we would implement the display of students to be based on the alphabetical order of their names. This would make it much more intuitive and easier to search for users.
Appendix: Instructions for manual testing
Given below are instructions to test the app manually.
Launch and shutdown
-
Initial launch.
-
Download the jar file and copy it into an empty folder.
-
Double-click the jar file.
Expected: Shows the GUI with a set of sample batchmates. The window size may not be optimum.
-
-
Saving window preferences.
-
Resize the window to an optimum size. Move the window to a different location. Close the window.
-
Re-launch the app by double-clicking the jar file.
Expected: The most recent window size and location are retained.
-
Adding a batchmate
-
Adding a batchmate to the data.
-
Test case:
add n/John t/johnnn.
Expected: A new batchmate with the nameJohnand telegram handlejohnnnis added at the bottom of the Students panel in Mass Linkers. The status message indicates that a batchmate namedJohnhas been successfully added.- Prerequisite: A batchmate with the name
Tomand the telegramtommmmis already in Mass Linkers.
Test case:add n/Tom t/tommmm.
Expected: No batchmate is added. The status message indicates that the batchmate already exists in Mass Linkers. Uniqueness is verified using two of the mandatory fields - theStudent’s name and telegram handle.
- Prerequisite: A batchmate with the name
-
Test case:
add n/John t/johnxyz i/ai g/john.
Expected: A new batchmate with the nameJohn, telegram handlejohn, interestsaiand GitHubjohnis added at the bottom of the Students panel in Mass Linkers. The status message indicates that a batchname namedJohnhas been successfully added. -
Test case:
add n/John.
Expected: No batchmate is added. The status message indicates that the command is of an invalid format. -
Other incorrect
addcommands to try:add,add n/John t/johnnn x/invalid,...(where x is any invalid prefix).
Expected: Similar to previous.
-
Deleting a batchmate
-
Deleting a batchmate while all batchmates are being shown.
-
Prerequisites: List all batchmates using the
listcommand. There are multiple batchmates in the list. -
Test case:
delete 1.
Expected: First batchmate is deleted from the list. Details of the deleted batchmate are shown in the status message. -
Test case:
delete 0.
Expected: No batchmate is deleted. Error details are shown in the status message. -
Other incorrect
deletecommands to try:delete,delete x,...(where x is larger than the list size).
Expected: Similar to previous.
-
Find batchmates
-
Find batchmates using keyword(s).
-
Prerequisites: List all batchmates using the
listcommand. There are multiple batchmates in the list. -
Prerequisite: There exists a batchmate with telegram handle
charlie.
Test case:find char.
Expected: The batchmate with telegram handlecharlieappears in the Students panel after executing the command. -
Prerequisite: There exists a batchmate with telegram handle
charlieand a batchmate with nameTom.
Test case:find char Tom.
Expected: The batchmate with telegram handlecharlieand batchmate namedTomappear in the Students panel after executing the command. -
Other incorrect
findcommands to try:find(no keywords provided).
Expected: The status message will indicate that the command is invalid.
-
Add mods to a batchmate
-
Add mods to a batchmate.
-
Prerequisites: List all batchmates using the
listcommand. There are multiple batchmates in the list. -
Test case:
mod add 1 cs2103t cs2101.
Expected: The modsCS2103TandCS2101will be present in the mods pane when the batchmate located at index 1 is selected. -
Other incorrect
mod addcommands to try:mod add cs2103t,mod add 1 xxx(where xxx is any invalid mod name).
Expected: No mods are added, and the status message will indicate that the command is invalid.
-
Mark mod(s) for a batchmate
-
Mark mod(s) for a batchmate.
-
Prerequisites: List all batchmates using the
listcommand. There are multiple batchmates in the list. -
Prerequisites: The batchmate at index 1 must have the mods CS2103T and CS2101.
Test case:mod mark 1 cs2103t cs2101.
Expected: The modsCS2103TandCS2101will be marked as taken in the mods pane when the batchmate located at index 1 is selected. -
Other incorrect
mod markcommands to try:mod mark cs2103t,mod mark 1 xxx(where xxx is any mod name that is not in the list of mods for that batchmate).
Expected: No mods are added, and the status message will indicate that the command is invalid.
-
Saving data
-
Dealing with missing/corrupted data files.
- Go to the data file located at
data/massLinkers.json. If the directory is not present, run Mass Linkers, modify the data, and exit. The data file should be present in the directory. - Attempt to corrupt the data by deleting a closing brace
}at the end of the file. - Reopen Mass Linkers.
Expected: Mass Linkers will run and start with an empty data file. No batchmates will be shown on the Students panel.
- Go to the data file located at
-
All data saved.
- Add or edit batchmate(s) in Mass Linkers.
- Close Mass Linkers.
- Reopen Mass Linkers.
Expected: The data is saved, and the changes you made to the data are still present.